
Application hosting
Deploy NestJS applications
A complete guide to deploying a compiled NestJS API or web application with HostRight Control Panel, databases, Redis and SSL.
NestJS is a structured Node.js framework for APIs, services and larger applications. A production NestJS deployment compiles TypeScript into dist, then starts the compiled entry point in a managed Node.js application.
This page uses example.com and apps/nest-api.
Prepare the project
Keep source code and compiled output in a private application root:
apps/nest-api/
├── src/
│   ├── main.ts
│   └── app.module.ts
├── public/
├── package.json
├── package-lock.json
└── tsconfig.json
Use production scripts similar to:
{
  "scripts": {
    "build": "nest build",
    "start": "node dist/main.js",
    "start:prod": "node dist/main.js"
  }
}
Bind the application to the hosting port:
async function bootstrap() {
  const app = await NestFactory.create(AppModule);
  await app.listen(process.env.PORT ?? 3000, '127.0.0.1');
}

bootstrap();
If your application uses the Express adapter and static files, configure them from the compiled entry point:
app.useStaticAssets(join(__dirname, '..', 'public'));
Create the managed Node.js application
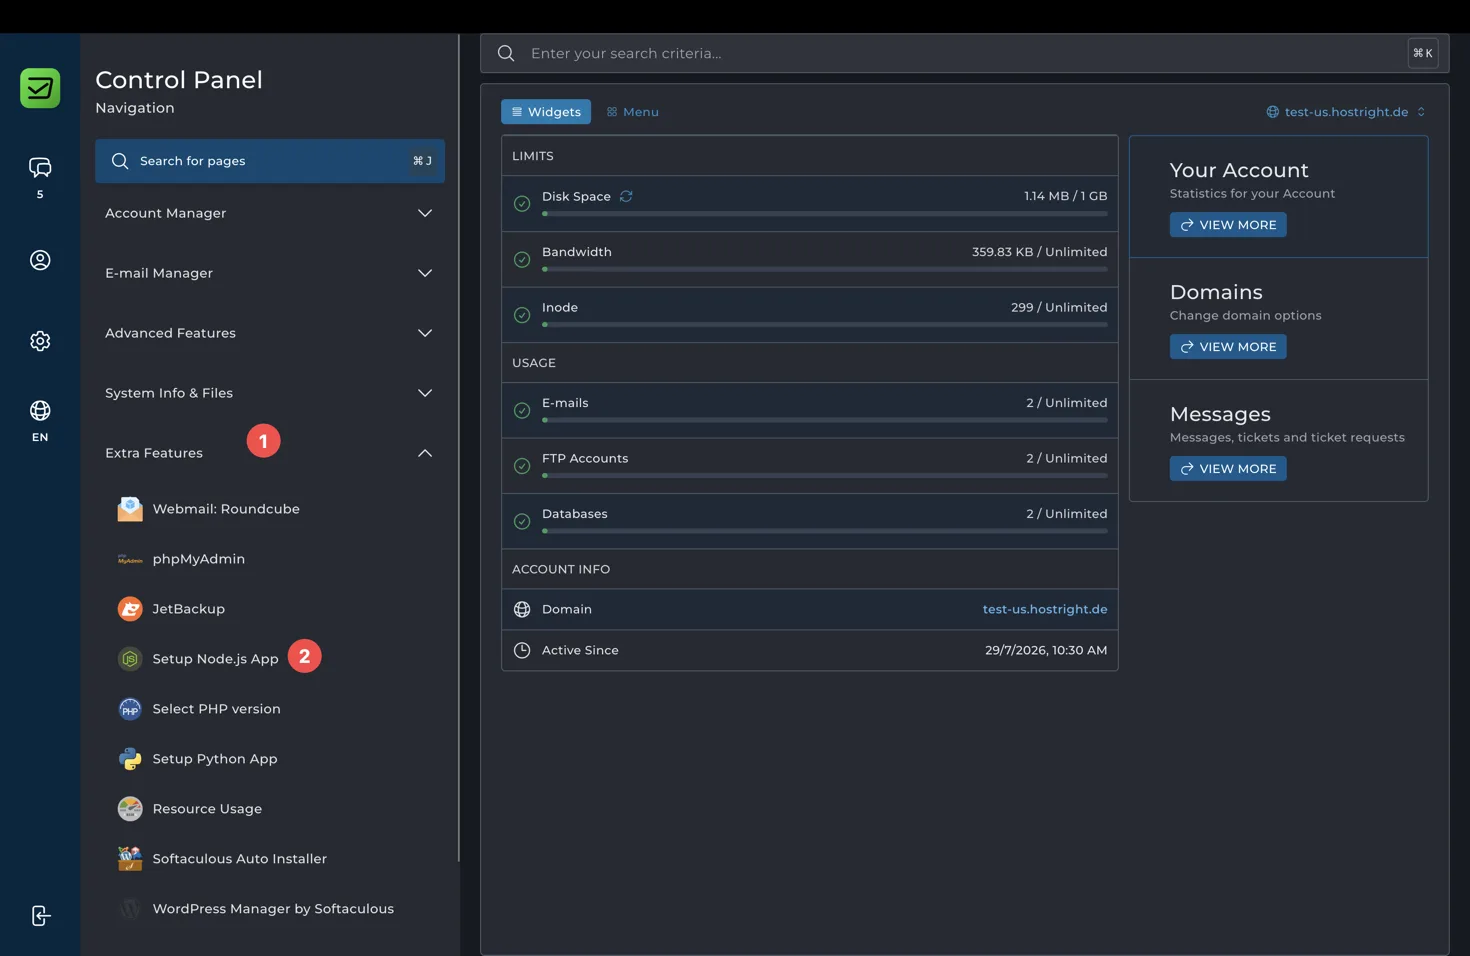
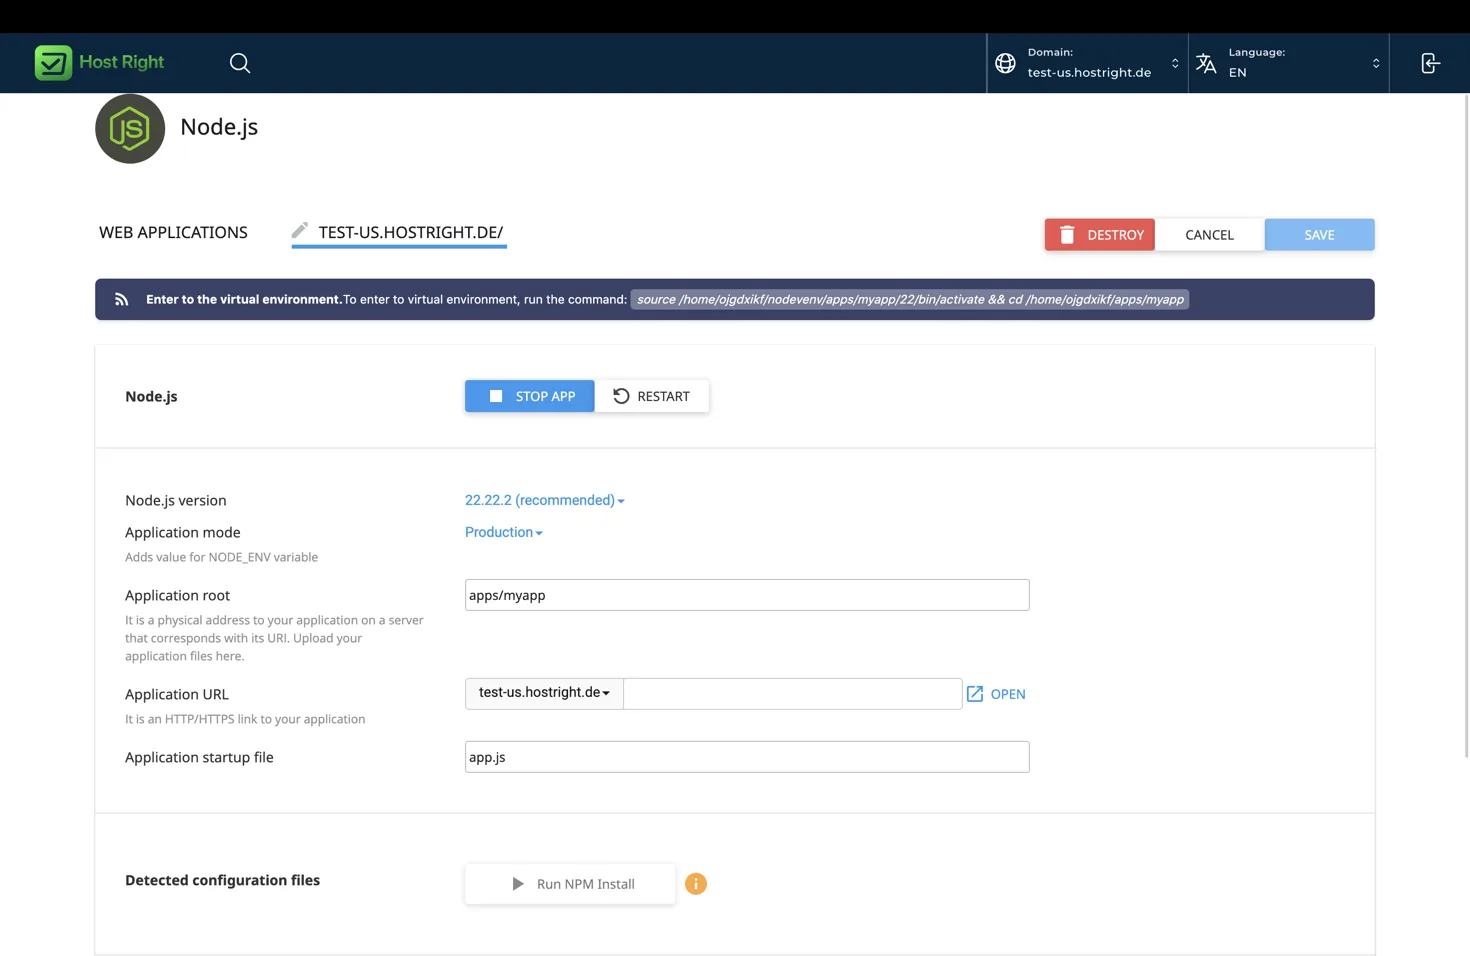
Open HostRight Control Panel, expand Extra Features, and choose Setup Node.js App.
Select Create Application.
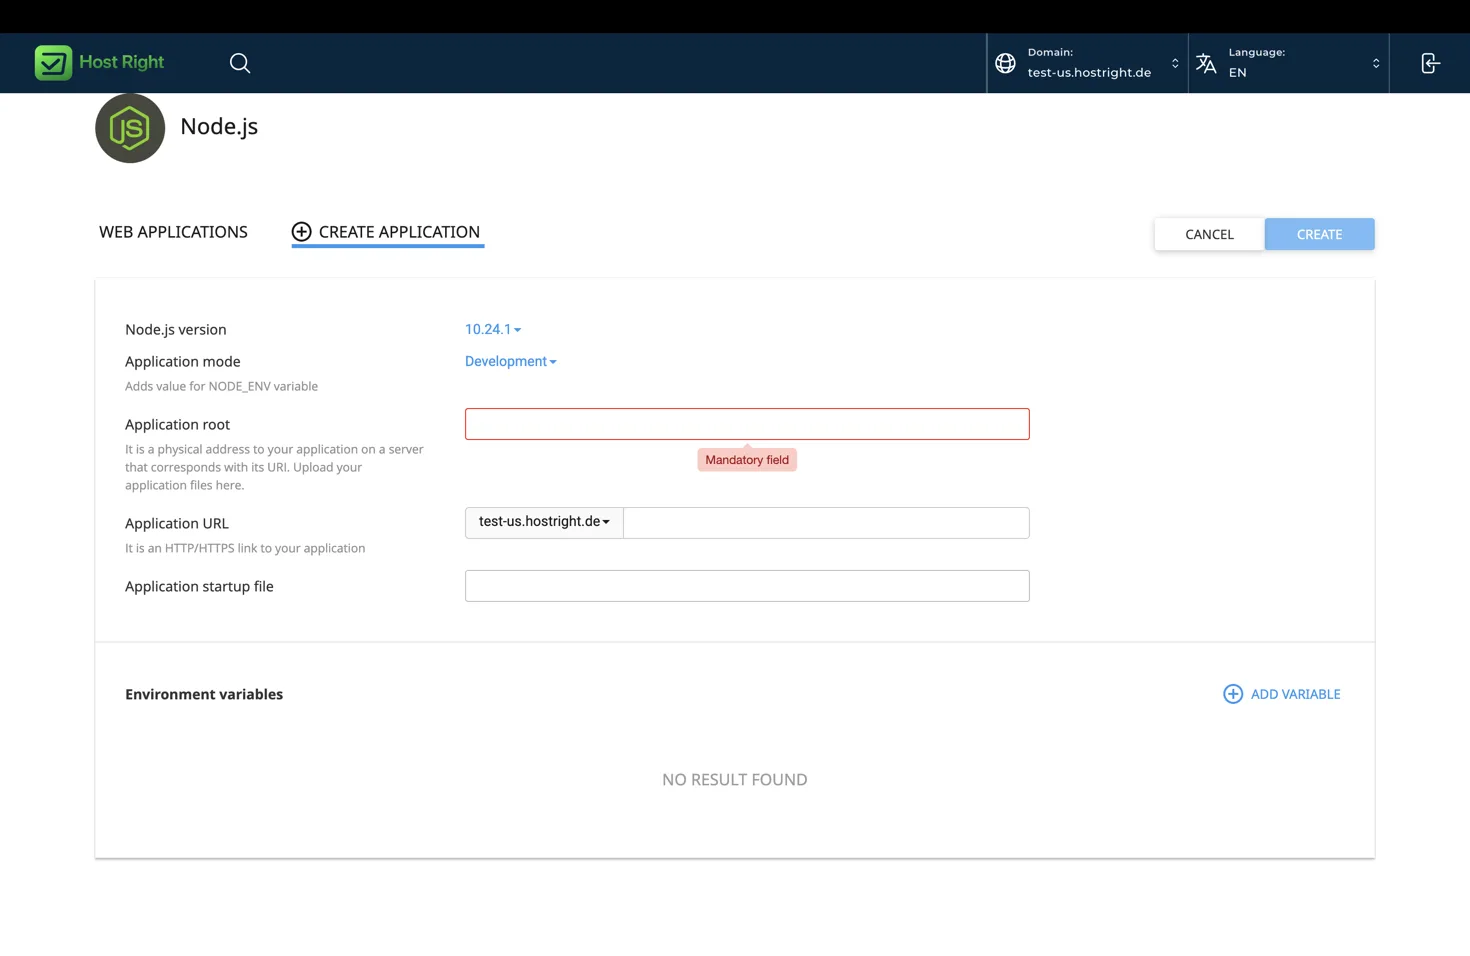
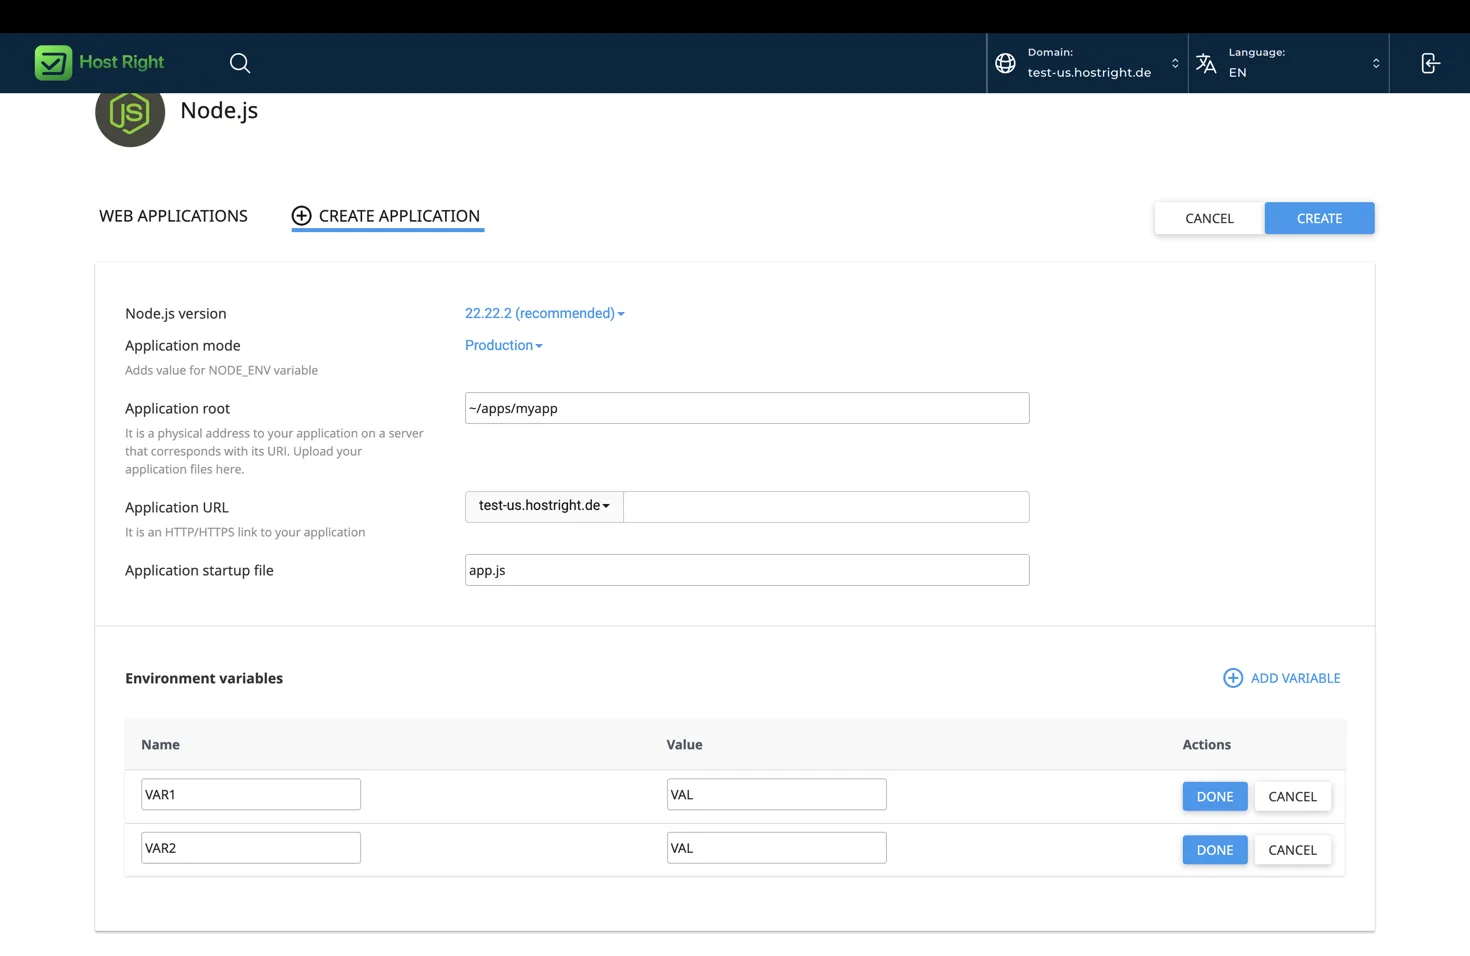
Use:
| Field | Value |
|---|---|
| Node.js version | A supported version compatible with NestJS and dependencies |
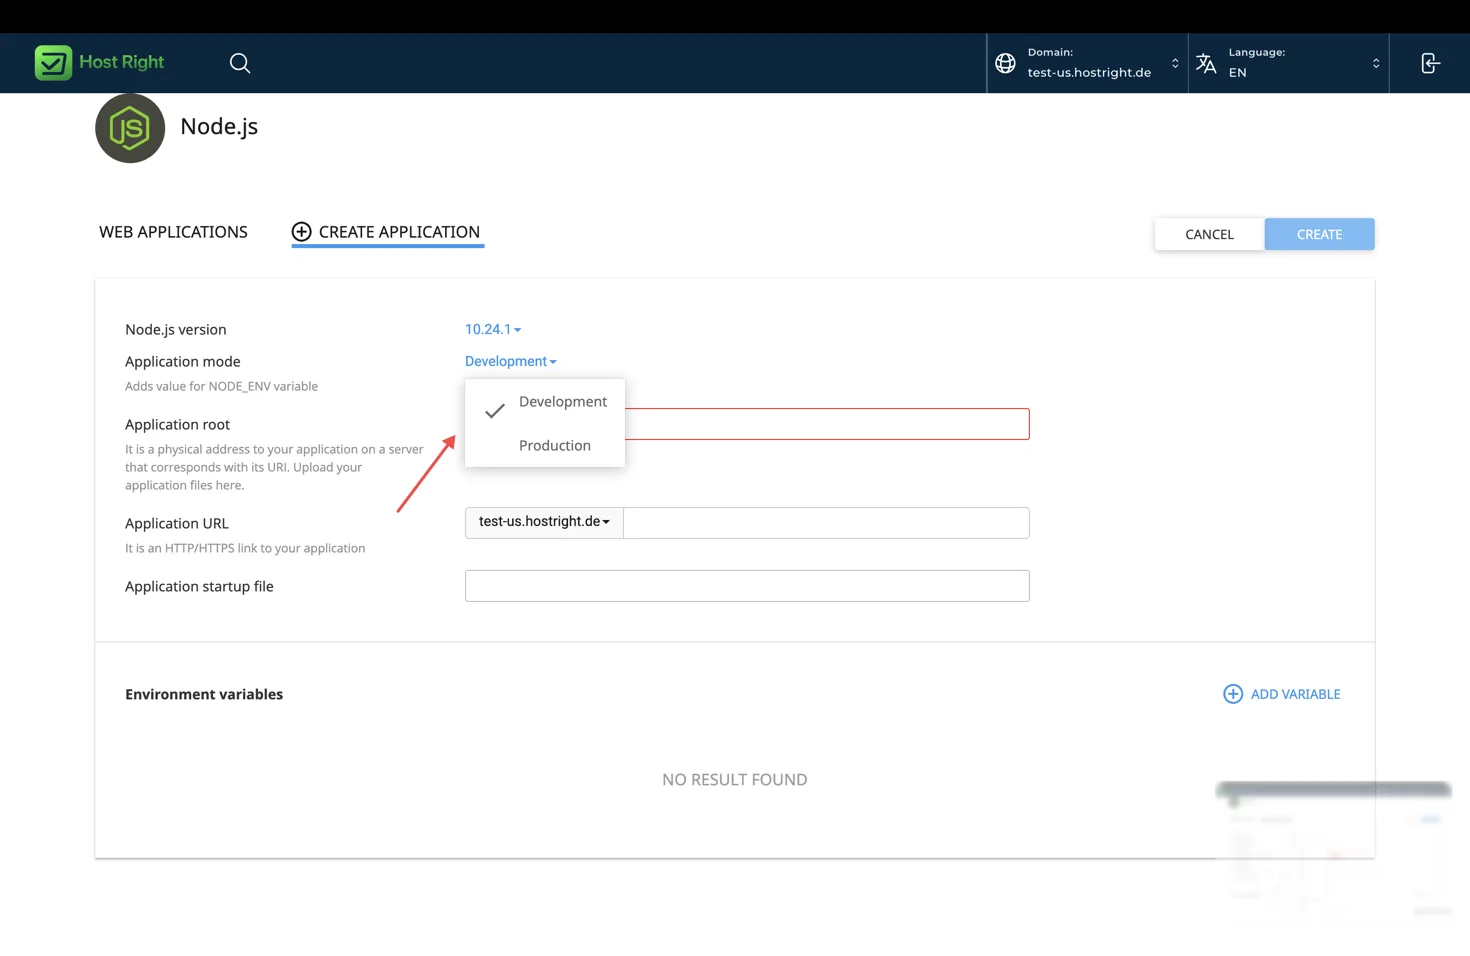
| Application mode | Production |
| Application root | apps/nest-api |
| Application URL | example.com |
| Startup file | app.js |
Create app.js if HostRight Control Panel needs a root-level startup file:
require('./dist/main.js');
Select Production mode. Add NODE_ENV=production, database settings, JWT or session secrets and REDIS_URL as environment variables.
Build and deploy
Deploy with Git:
cd ~/apps
git clone YOUR_REPOSITORY_URL nest-api
cd nest-api
npm ci
npm run build
Run the compiled entry point manually if you need to diagnose startup:
NODE_ENV=production node dist/main.js
Use the command displayed by HostRight Control Panel to enter the managed environment. After a successful build, restart from the application details page.
For manual transfers use SFTP. Use SSH for builds, migrations and logs. FTP is limited to transferring files.
Static files and views
Copy public files into the deployment and serve them from NestJS. The path must work after TypeScript compiles into dist. A common setup is public at the project root and join(__dirname, '..', 'public') in the compiled entry point.
If the application renders templates, deploy the views directory and configure the template adapter with a path based on __dirname. Verify the production build contains every file that the adapter needs.
Database configuration
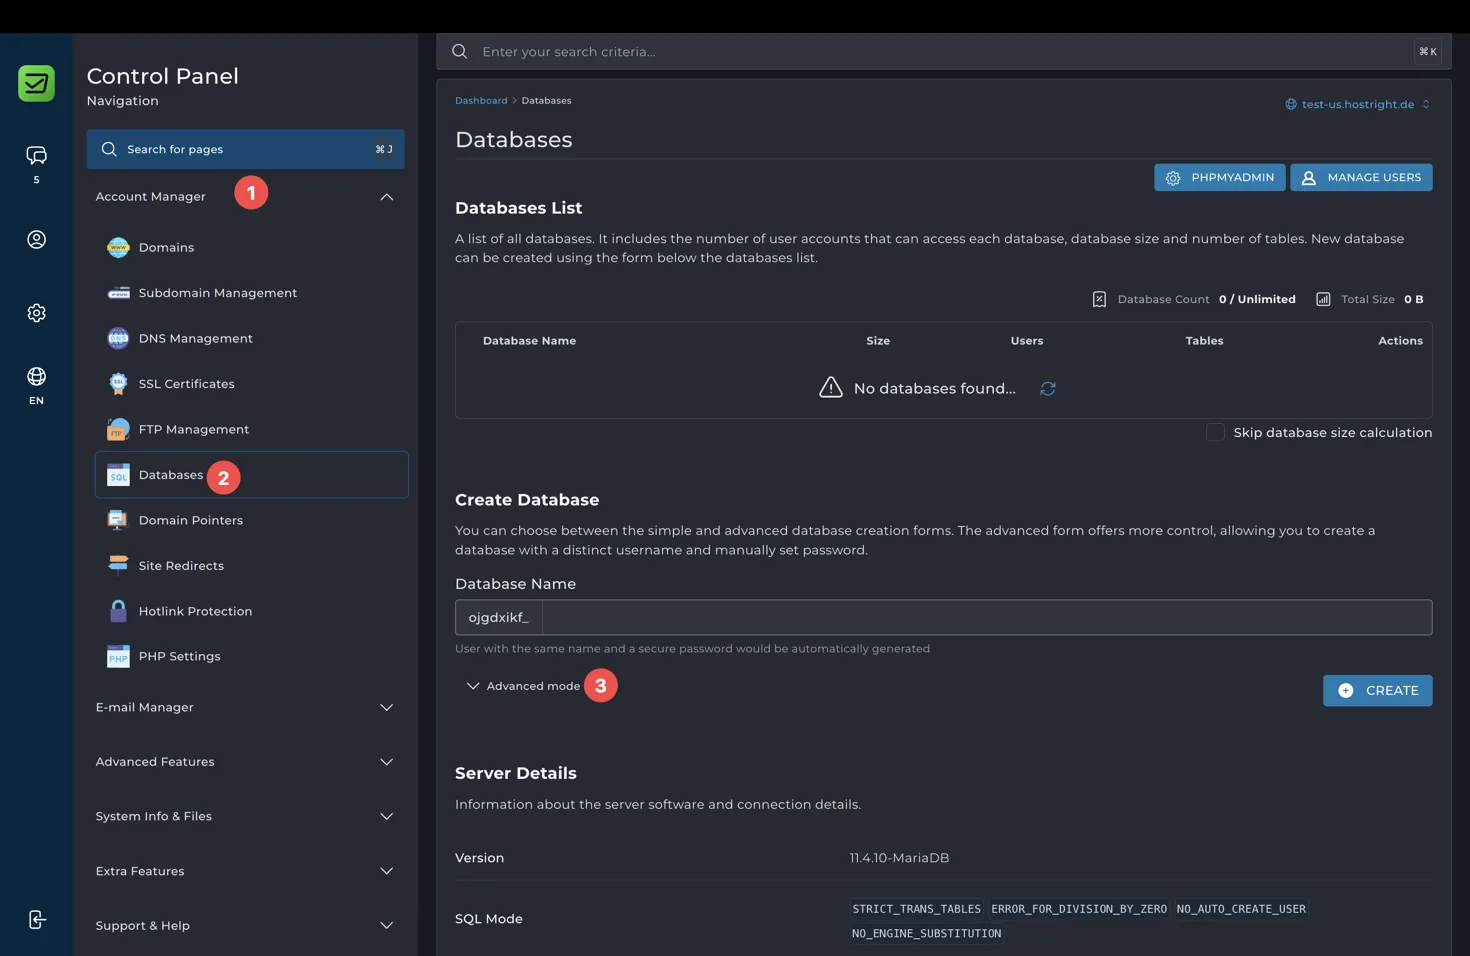
Create a database and user in HostRight Control Panel. Put the connection string or individual values in environment variables and initialize the ORM from NestJS configuration:
ConfigModule.forRoot({
  isGlobal: true,
  ignoreEnvFile: true,
});
Run migrations before restarting:
npm run migration:run
npm run build
Use the database management guide for the panel-specific database creation steps. Never expose database values through a public configuration endpoint.
Redis, queues and cache
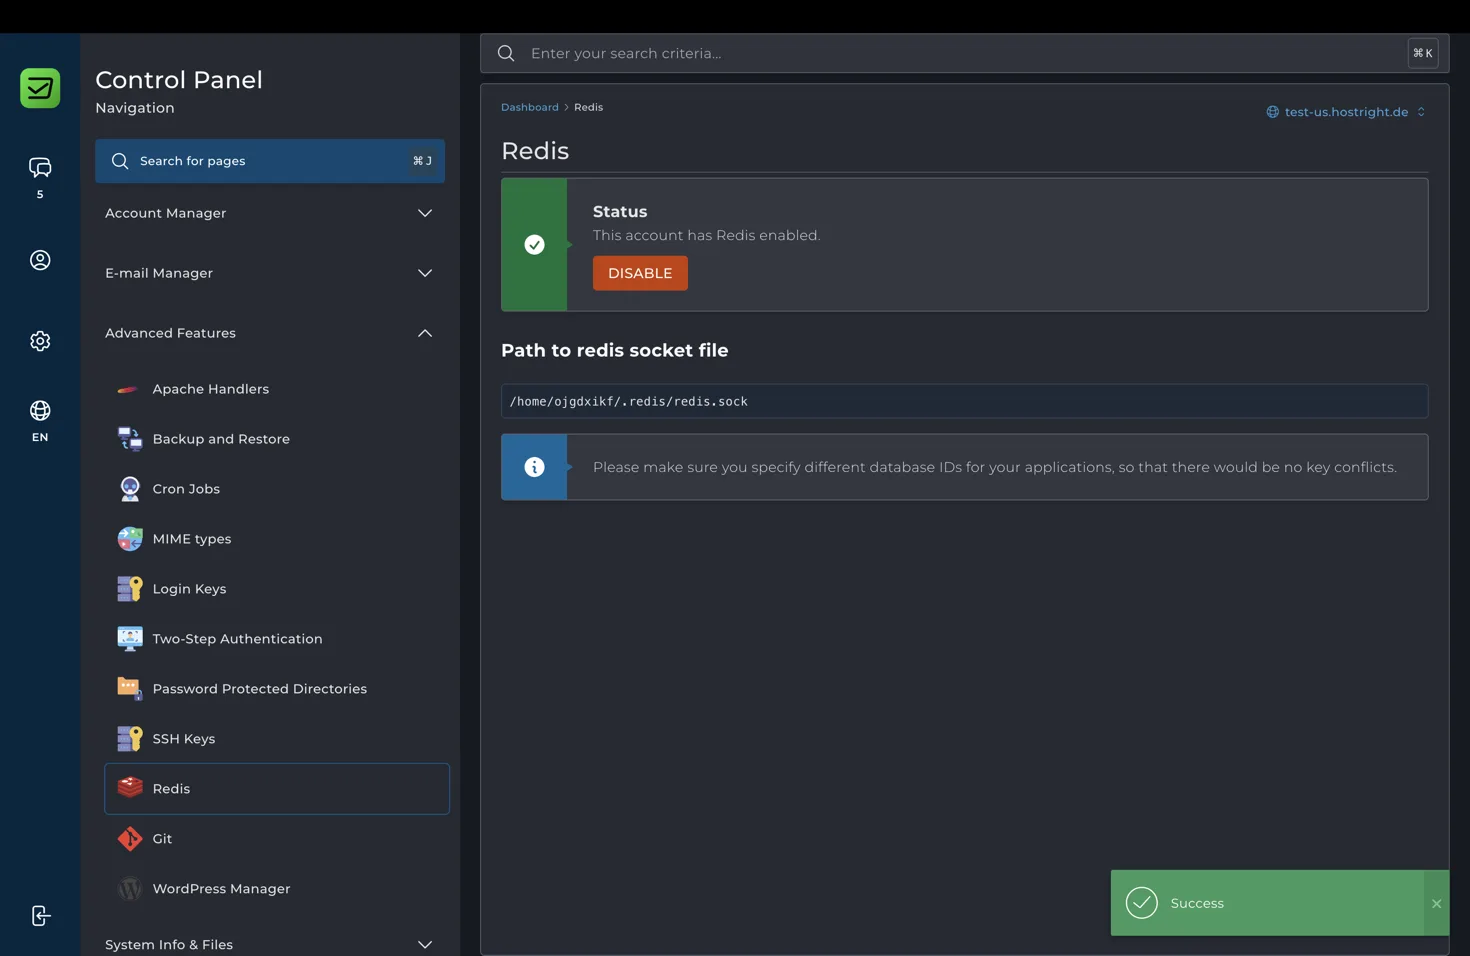
Redis is useful for BullMQ queues, sessions, caching and rate limits. Enable Redis in the panel, copy the socket or URL, and add REDIS_URL to HostRight Control Panel environment variables.
For BullMQ-style configuration, keep the connection in server-side module configuration:
BullModule.forRoot({
  connection: {
    url: process.env.REDIS_URL,
  },
});
Do not run a queue worker as an HTTP startup file unless the hosting plan and process model explicitly support that workload. Use a separate application or scheduled job when appropriate. The Redis guide explains the socket after this basic Redis setup.
SSL and trusted proxy settings
Issue SSL for the domain after DNS is active. If authentication or secure cookies depend on the original protocol, configure the adapter's proxy behavior and test HTTPS redirects.
Use the SSL certificate setup guide after confirming the application itself responds over HTTP through the managed mapping.
Release checklist
cd ~/apps/nest-api
git pull --ff-only origin main
npm ci --omit=dev
npm run build
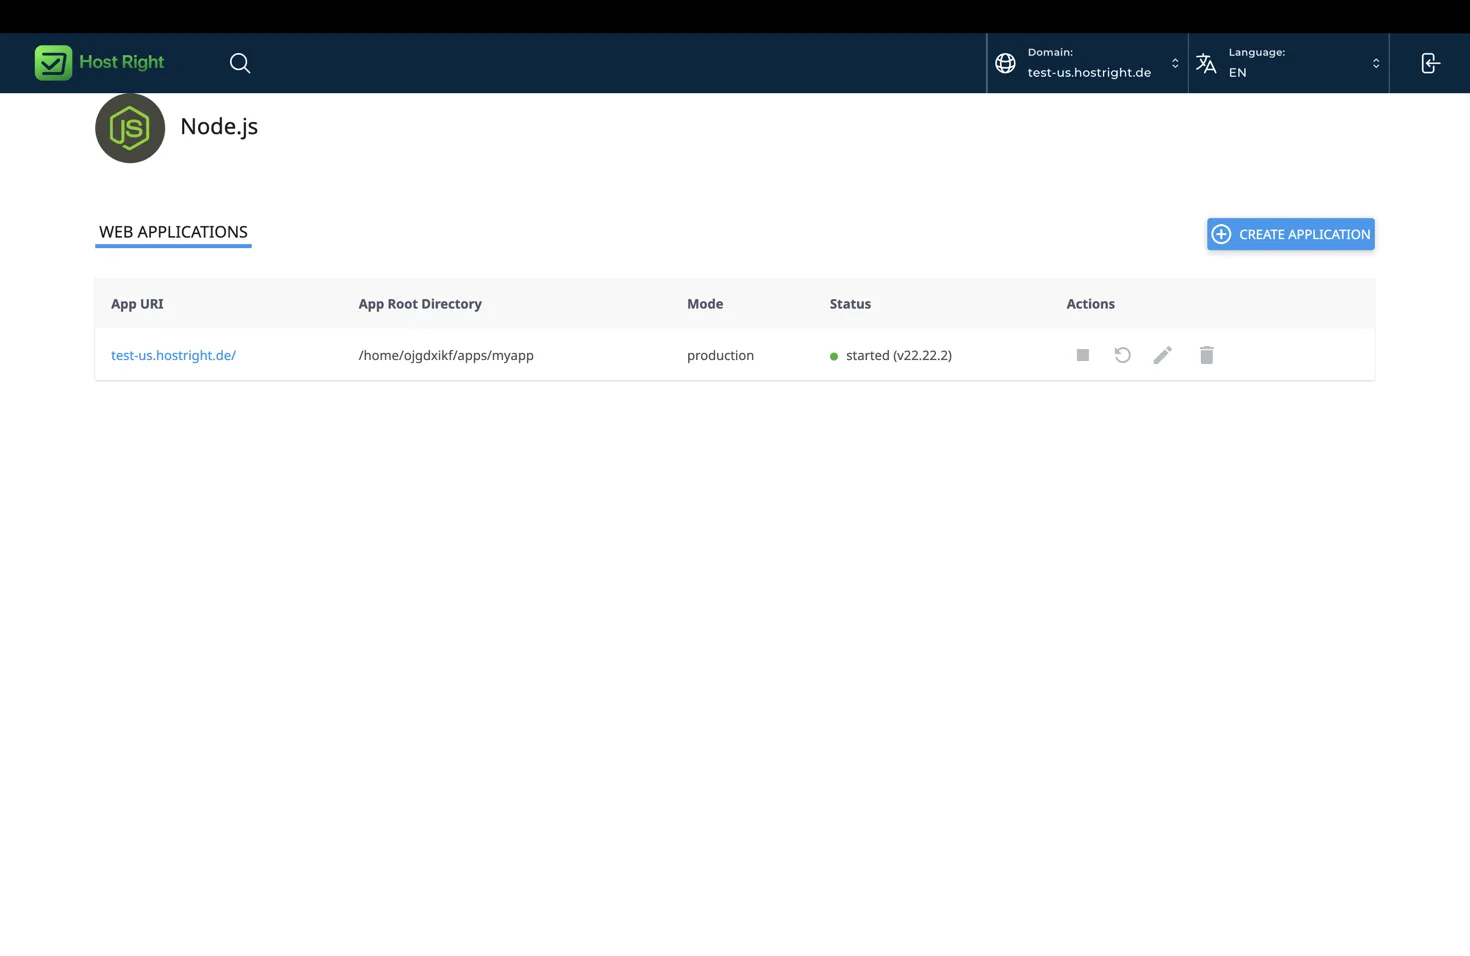
Run migrations, then select Restart. Check the application list for a started status.
Troubleshooting
Cannot find dist/main.js: run npm run build and confirm the configured Nest entry point.
The application starts then stops: run NODE_ENV=production node dist/main.js and inspect the first exception.
Static files return 404: verify the path is relative to the compiled file and that public was uploaded.
Database errors: confirm credentials, permissions and migration state.
Redis or queues fail: check REDIS_URL, the Redis client configuration and whether the queue worker is running as a supported application.