
Domains
Manage an external domain with external nameservers
Point a domain managed outside HostRight to your hosting account while keeping DNS and email records at your DNS provider.
Use this setup when your domain is registered with another provider and you want to keep DNS at that provider, such as Cloudflare, your registrar, or another DNS host. HostRight will still host your website, databases, and mailboxes; the external provider will answer DNS queries for the domain.
Important: Changing nameservers changes the authoritative DNS provider for the whole domain. Before you switch, copy every existing DNS record, especially records for email, verification services, and subdomains.
What you need first
- Access to the domain registrar, where nameservers are changed
- Access to the external DNS provider, where records are created
- The domain or subdomain already added in HostRight → Domains
- The complete record list shown in HostRight → DNS Management
1. Add the domain in HostRight
Add the domain to your HostRight account and confirm the website or application is connected to the correct domain home. If you also use HostRight email, create the mailboxes before changing DNS so you can test delivery as soon as the records resolve.
2. Find the exact HostRight DNS values
In the HostRight control panel, open Account Manager → DNS Management and select the domain. Copy the values exactly as shown. Use the edit controls to inspect long TXT values, and keep quotation marks only when the DNS provider's editor expects them.
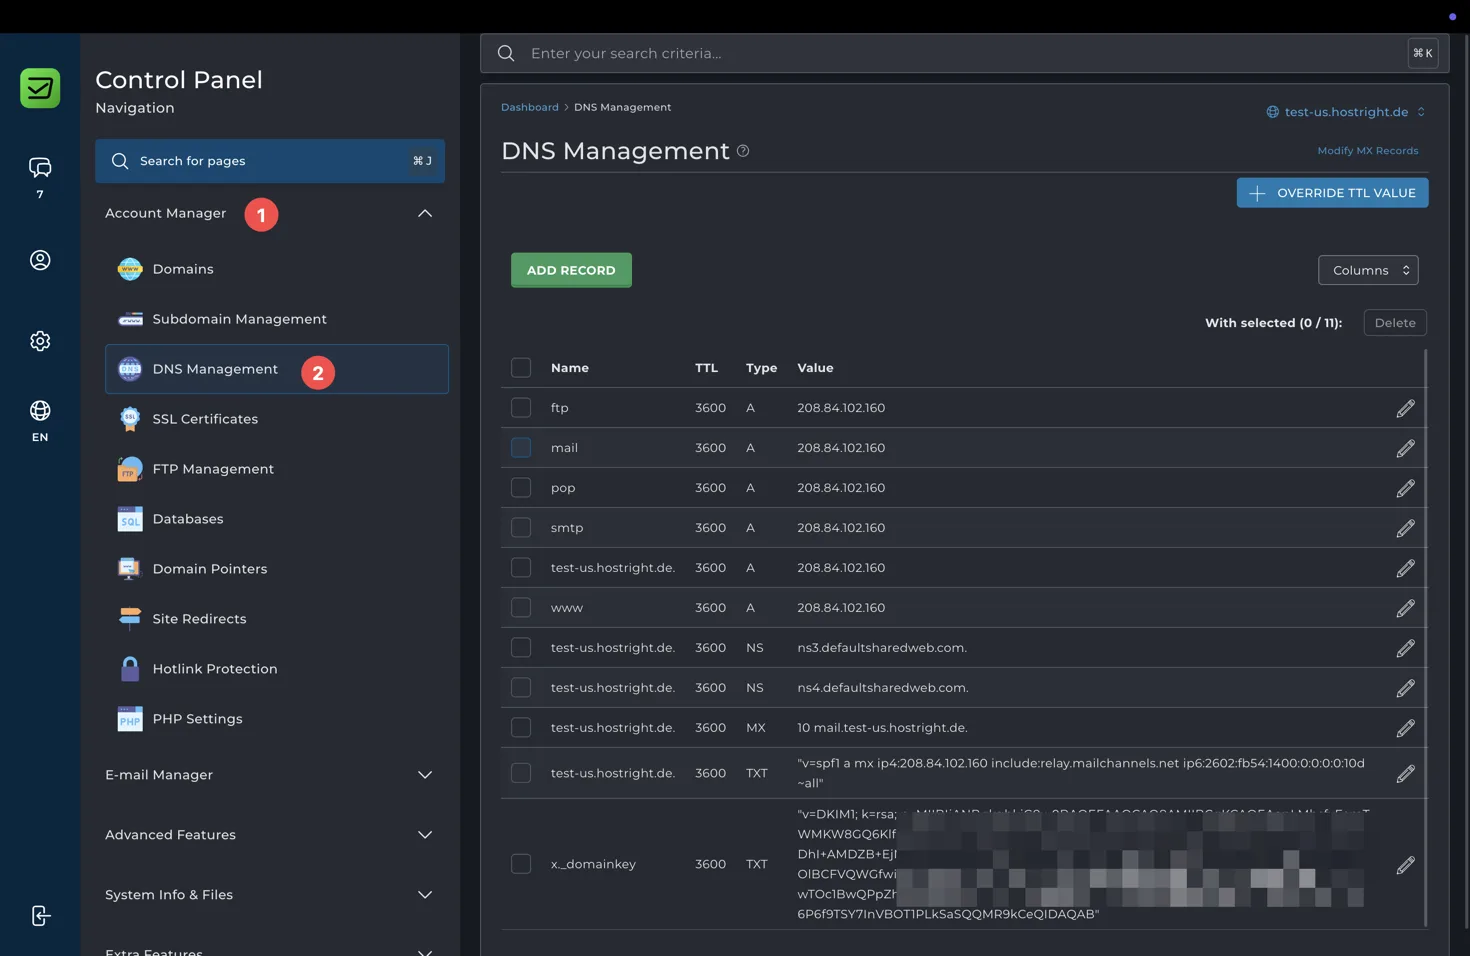
HostRight DNS Management shows the website, mail, MX, SPF, and DKIM values to reproduce at the external DNS provider.
The list normally includes records similar to these:
| Purpose | Record types to copy | What to check |
|---|---|---|
| Website | A for the root domain and www |
Copy the HostRight IP address exactly. Do not guess an IP. |
| HostRight services | A records such as ftp, mail, pop, and smtp |
Keep these records if you use the corresponding service. |
| Email delivery | MX |
Copy the priority and the complete mail hostname. |
| Sender policy | TXT at the root |
Copy the complete SPF value as one record. |
| DKIM signing | TXT at the selector, often x._domainkey |
Copy the entire long key without changing, wrapping, or truncating it. |
| Other services | TXT, CNAME, or verification records |
Re-create any records used by Google, Microsoft, payment providers, analytics, or subdomains. |
Do not copy the old NS records into the new DNS zone as ordinary records. The registrar's nameserver fields control delegation; the DNS provider will publish its own authoritative nameservers.
3. Change nameservers at the registrar
Open the domain's Nameservers or DNS delegation page at the registrar. Replace the current nameservers with the nameservers supplied by your external DNS provider, then save.
Do this only after the external DNS zone contains the records you need. Nameserver changes can take time to propagate, and during the transition different resolvers may use the old or new DNS provider.
4. Re-create the records at the external DNS provider
Open the external provider's DNS records page and add each required record from HostRight → DNS Management.
Use the provider's format for the Name field:
- The root domain may be shown as
@, the full domain, or an empty name. - A HostRight name such as
wwwis usually entered aswww. - A DKIM name such as
x._domainkeymust remainx._domainkey; do not remove the selector. - If the provider automatically appends the domain, do not paste the full domain twice.
For the website's A records, use DNS only while validating the direct HostRight connection. If you are using Cloudflare and want its CDN, proxy only the web hostnames after the origin certificate and SSL settings are ready. Never proxy mail records such as MX, mail, smtp, pop, or ftp unless the provider explicitly supports that service.
Copy email records carefully
Email problems are usually caused by an incomplete DNS migration. Make sure you copy all of the following when they are present in HostRight DNS Management:
- The
MXrecord, including its priority and trailing mail hostname. - The root-domain SPF
TXTrecord, including everyinclude:value. - The complete DKIM
TXTrecord and selector, usually underx._domainkey. - Any additional
TXTrecords used for DMARC or provider verification. - The
Arecord formailand anypoporsmtprecords used by your mail client.
Do not create a second SPF record. Merge authorized senders into one SPF record if your existing DNS provider already has one. Two SPF records can cause SPF validation to fail.
5. Verify the migration
After saving the records, verify each hostname from outside the registrar's dashboard:
- Open the website at both the root domain and
www. - Confirm the
MXlookup returns the HostRight mail hostname. - Send a test message to a HostRight mailbox and reply from it.
- Check that SPF and DKIM pass in the headers of a received message.
- Test FTP or another service only if you use it.
DNS caches may keep old answers for the previous TTL. Do not delete the old DNS zone or cancel the old DNS service until the website and email have worked through the transition window.
Troubleshooting
- The website does not open: check the root and
wwwArecords, then confirm the domain is added to HostRight. - Mail is not delivered: check the
MXhostname and priority first. AnArecord formaildoes not replace anMXrecord. - DKIM fails: re-copy the selector and the complete TXT value. Do not paste the public key into the wrong selector or split it into multiple records unless the DNS provider documents that format.
- Cloudflare shows a certificate error: use the Cloudflare SSL and CDN guide and set the correct SSL mode after installing the origin certificate.
For a domain whose nameservers remain at HostRight, use connect a domain to your service instead.