
Application hosting
Deploy Python applications with HostRight Control Panel and Passenger
Deploy Django, Flask, Pyramid, Bottle, and other WSGI Python applications on HostRight with HostRight Control Panel, Phusion Passenger, SSH, SFTP, FTP, and Git.
Python hosting on HostRight
HostRight provides a managed Python application interface in HostRight Control Panel. It uses Phusion Passenger to run supported Python web applications inside your hosting account, so you can deploy a project without managing a VPS, system service, reverse proxy, or server package installation.
The workflow is:
- Prepare the Python project outside the public domain directory.
- Transfer the project with Git, SSH, SFTP, or FTP.
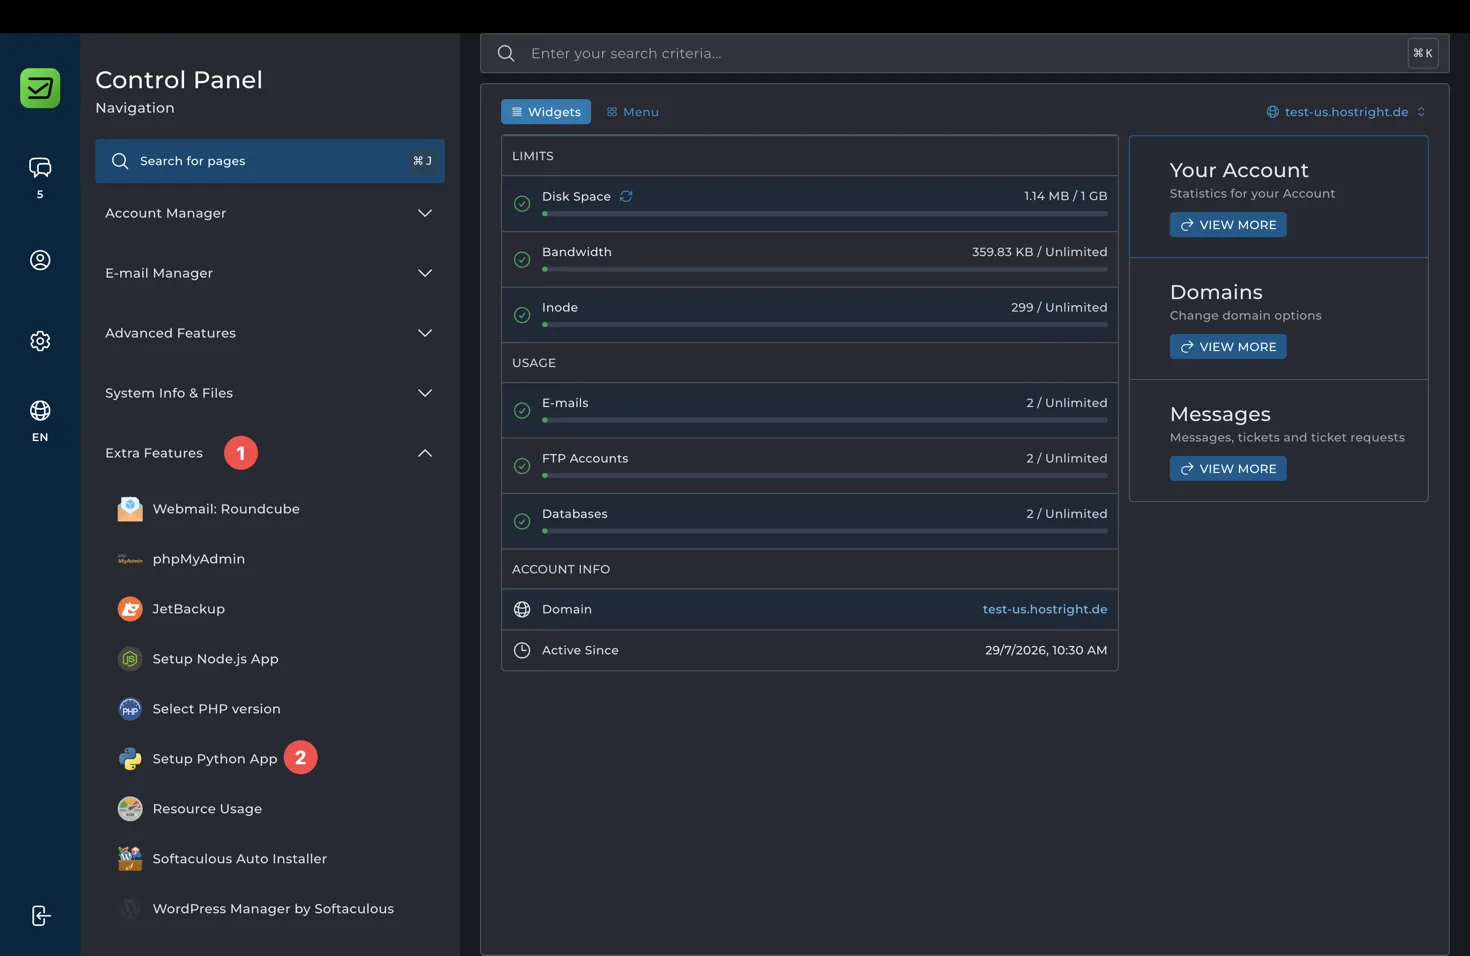
- Create the Python application in Extra Features → Setup Python App.
- Select a Python version, application root, URL, startup file, and WSGI entry point.
- Create the application and install dependencies in its environment.
- Set environment variables, run migrations or setup commands, and test the URL.
HostRight currently runs Python applications through WSGI. Django, Flask, Pyramid, Bottle, and custom WSGI applications fit this model. ASGI frameworks such as FastAPI need a WSGI-compatible adapter and should be tested carefully before production use.
Connect the domain and enable HTTPS
Before testing the Python application, make sure the domain points to the HostRight service. If HostRight manages DNS, use the nameservers shown for your service. If DNS is managed elsewhere, add the required records at that provider.
After the domain opens the HostRight server over HTTP, open Account Manager → SSL Certificates, select the domain and any required hostname variants, and request the automatic certificate.
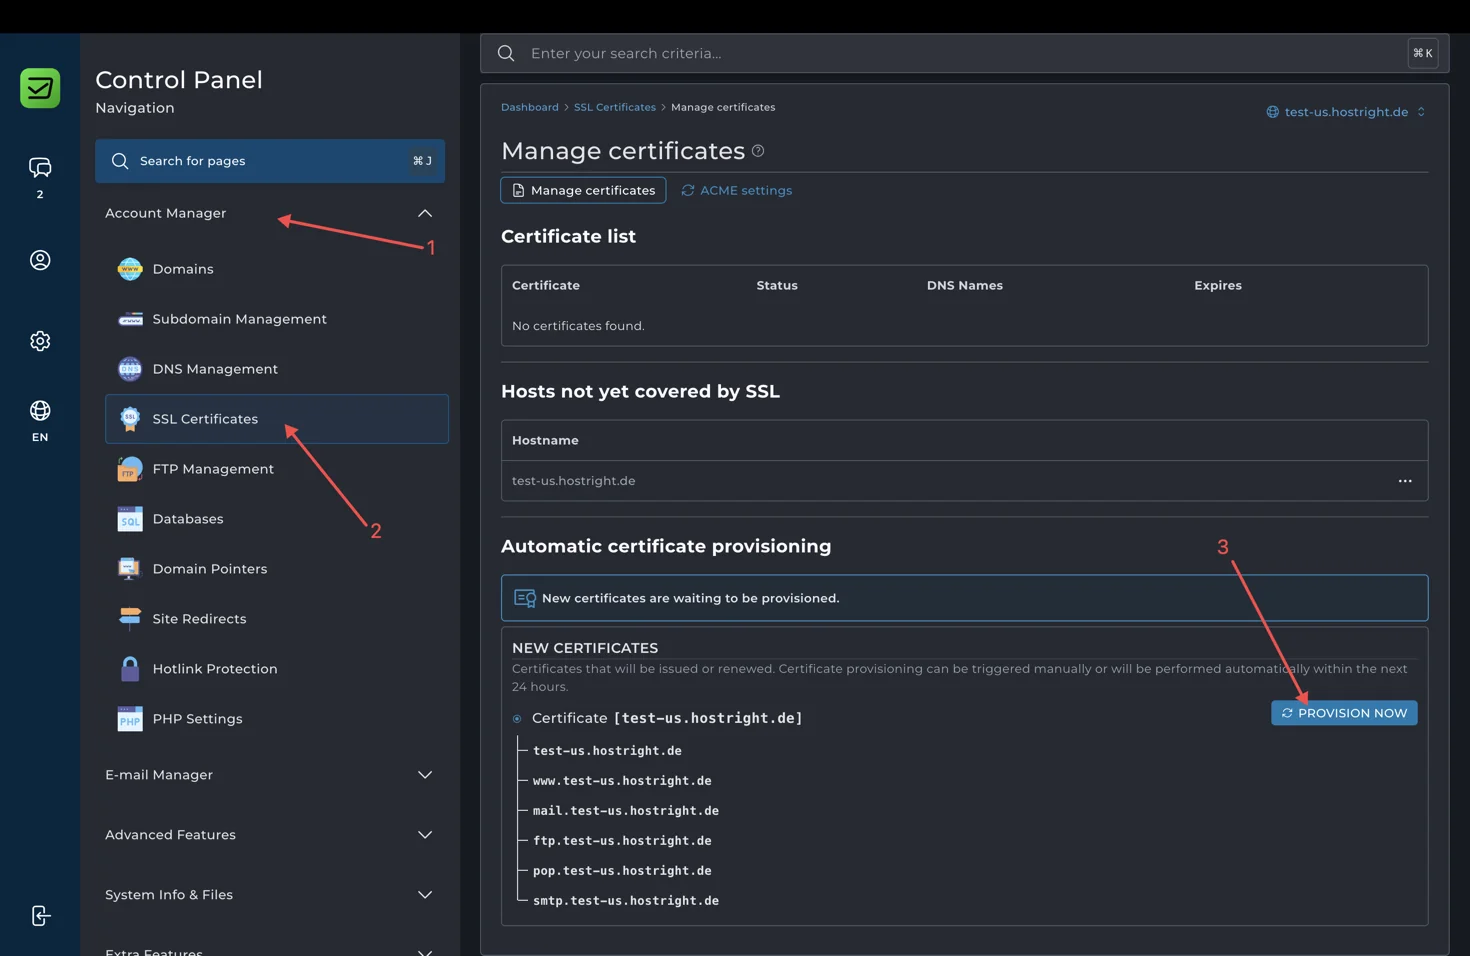
Once the certificate is issued, test both the domain and application URL over HTTPS. Configure the application to use secure cookies and HTTPS-aware redirects where the framework requires it.
Read the SSL setup instructions for DNS checks and certificate troubleshooting.
Create the database
Python applications commonly need a database for users, content, sessions, or application data. Open Account Manager → Databases, create a database and user, and save the generated credentials in a password manager.
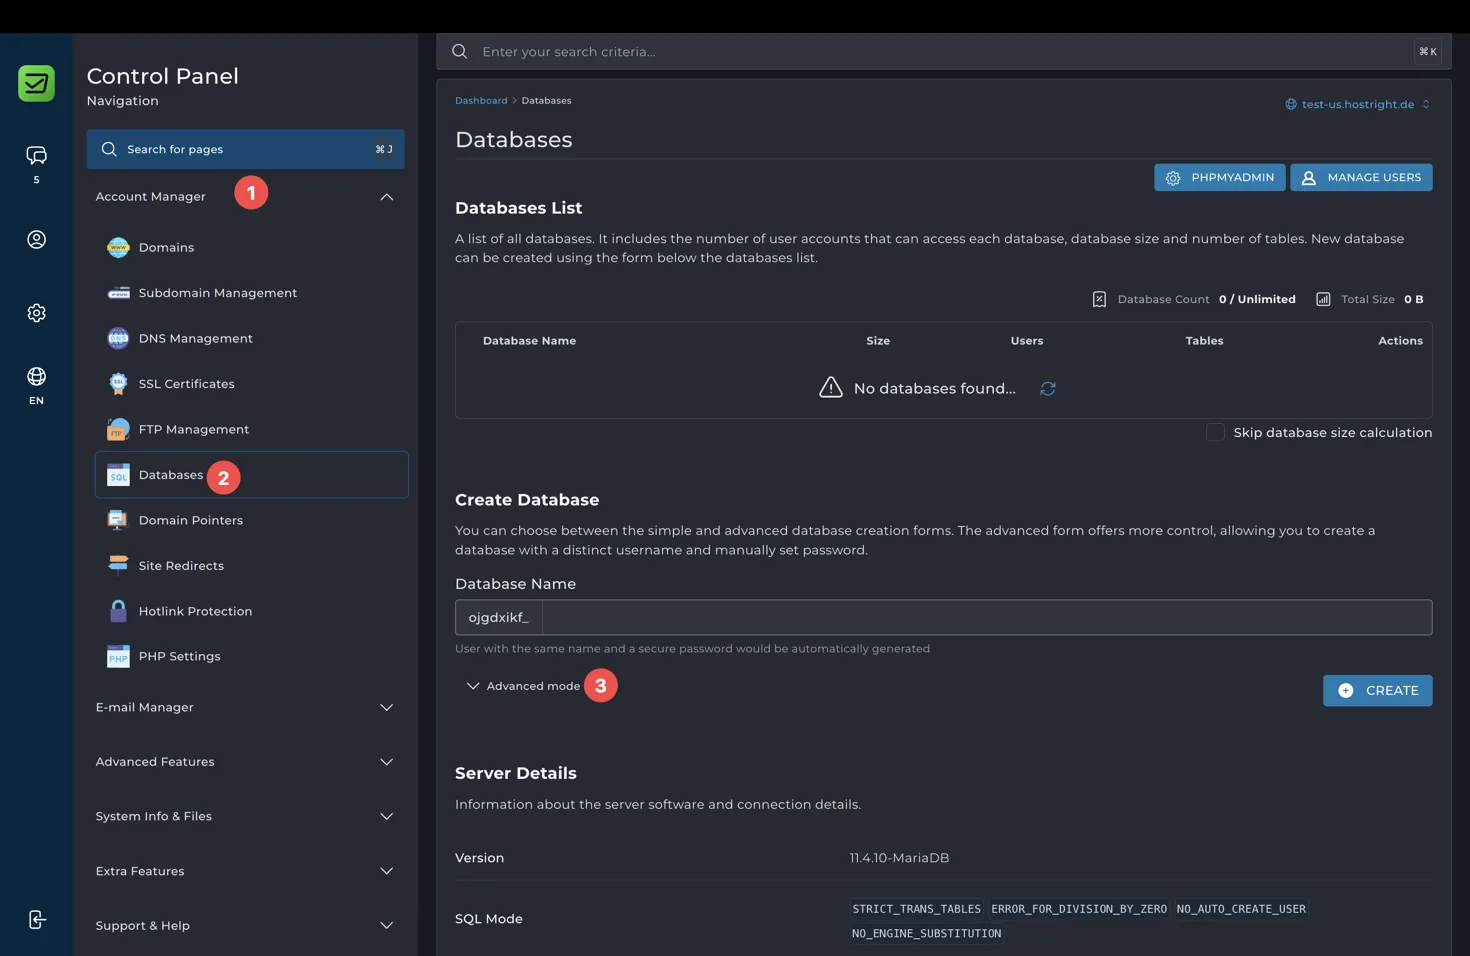
Use the database host, name, username, password, and port shown in the Control Panel. Put them in environment variables, not in a public file or Git repository:
DATABASE_HOST=localhost
DATABASE_NAME=accountprefix_example
DATABASE_USER=accountprefix_example
DATABASE_PASSWORD=replace-with-a-strong-password
DATABASE_PORT=3306
The exact host and socket path can vary by service. Use the values under Server Details and follow Create and manage a database for creation, import, export, and backup guidance.
Enable Redis for cache and sessions
Redis is optional. Enable it under Advanced Features → Redis, copy the account-specific Unix socket path, and configure the framework with that path.
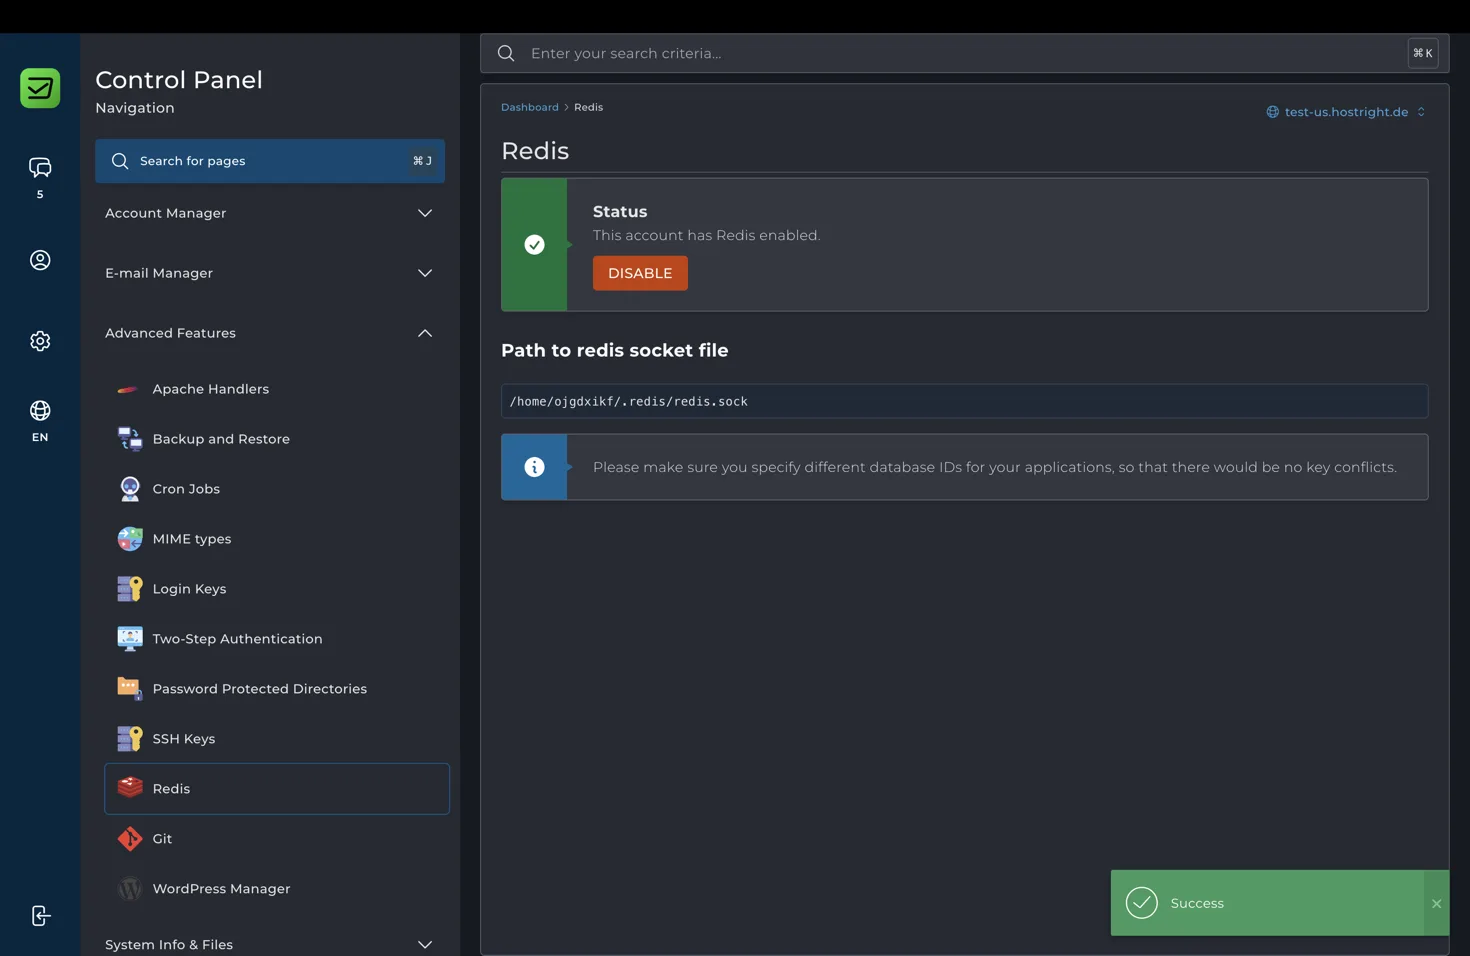
Example environment values:
REDIS_SOCKET=/home/ACCOUNT_USERNAME/.redis/redis.sock
REDIS_DATABASE=1
Use a different Redis database ID for each application or environment. Redis is appropriate for cache, sessions, queues, and short-lived data. It is not a replacement for the database. See Enable and use Redis for the full setup.
Keep the application outside the public domain folder
Create application files in a private account directory such as:
apps/example-app/
Do not place the virtual environment, .env file, source repository, private keys, or dependency cache inside public_html. The public directory should contain only files that are intentionally web-accessible.
A typical layout is:
apps/example-app/
├── app.py
├── passenger_wsgi.py
├── requirements.txt
├── .env                 # keep private, do not commit
├── src/                 # application package
└── static/              # optional public assets
For Django, the layout may look like this:
apps/example-app/
├── manage.py
├── passenger_wsgi.py
├── requirements.txt
├── project/
│   ├── settings.py
│   ├── urls.py
│   └── wsgi.py
└── staticfiles/
The application root in HostRight Control Panel must point to the directory that contains the startup file and project files.
Choose a transfer method
Git over SSH
Git is best for repeatable deployments and version history:
mkdir -p ~/apps
cd ~/apps
git clone git@github.com:example/example-app.git example-app
cd example-app
For a later release:
cd ~/apps/example-app
git pull --ff-only origin main
Use a deploy key or dedicated SSH key. See Use SSH and the chrooted terminal.
SFTP
SFTP is the preferred transfer method when the project is built locally:
sftp -i ~/.ssh/id_ed25519 USERNAME@SERVER_HOSTNAME
Inside SFTP, upload the project to its private directory:
cd apps/example-app
put -r .
FTP
FTP can be used when a deployment tool requires it. Create an account with the smallest directory scope possible, then upload the application files. FTP transfers files only. It does not install dependencies, set variables, run migrations, or restart Passenger.
See Deploy website files with FTP. SFTP or SSH is safer for Python deployments.
Create the Python application
In HostRight Control Panel, expand Extra Features and select Setup Python App. If no applications exist, select Create Application.
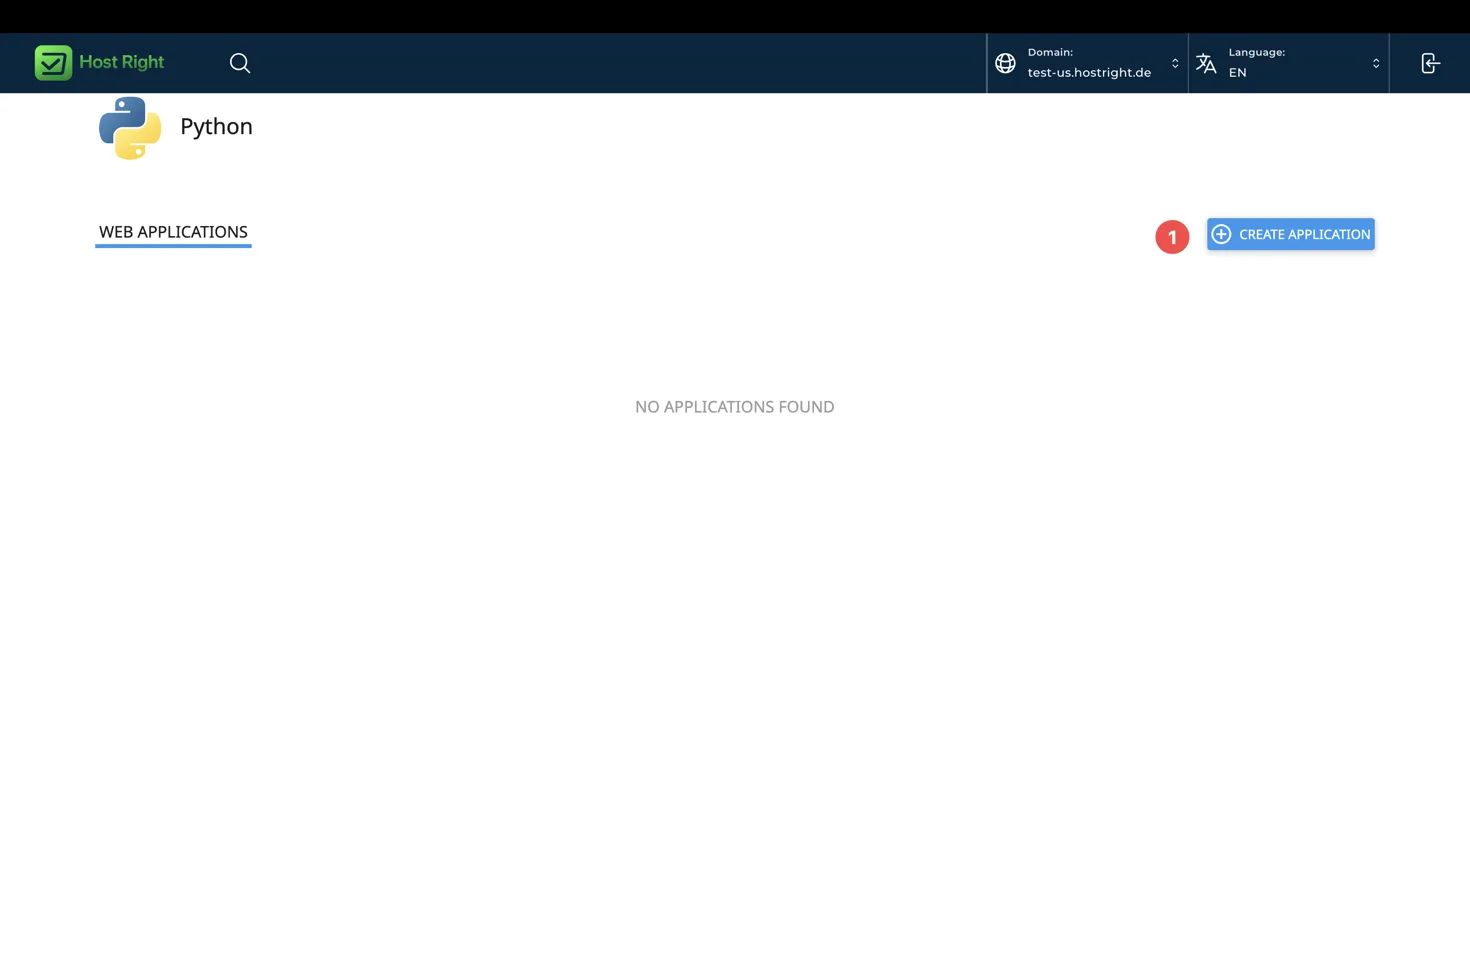
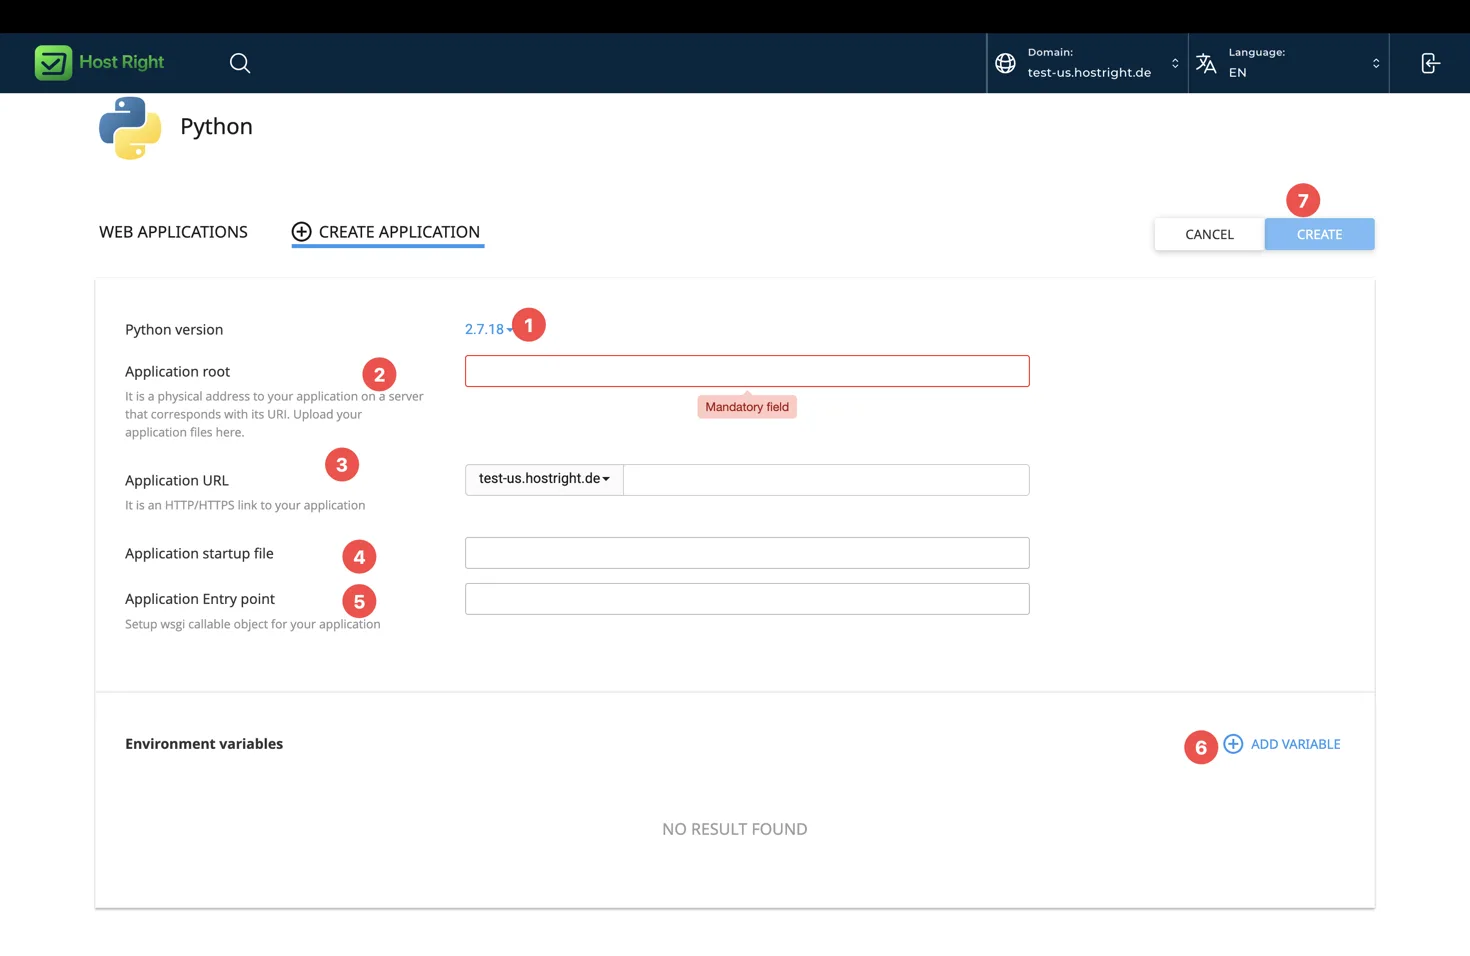
The form contains the Passenger settings:
- Python version: Select a version supported by the project and dependencies.
- Application root: Enter the private path, such as
apps/example-app. - Application URL: Select the domain and optional path.
- Application startup file: Enter the WSGI startup file, commonly
passenger_wsgi.py. - Application entry point: Enter the WSGI callable, commonly
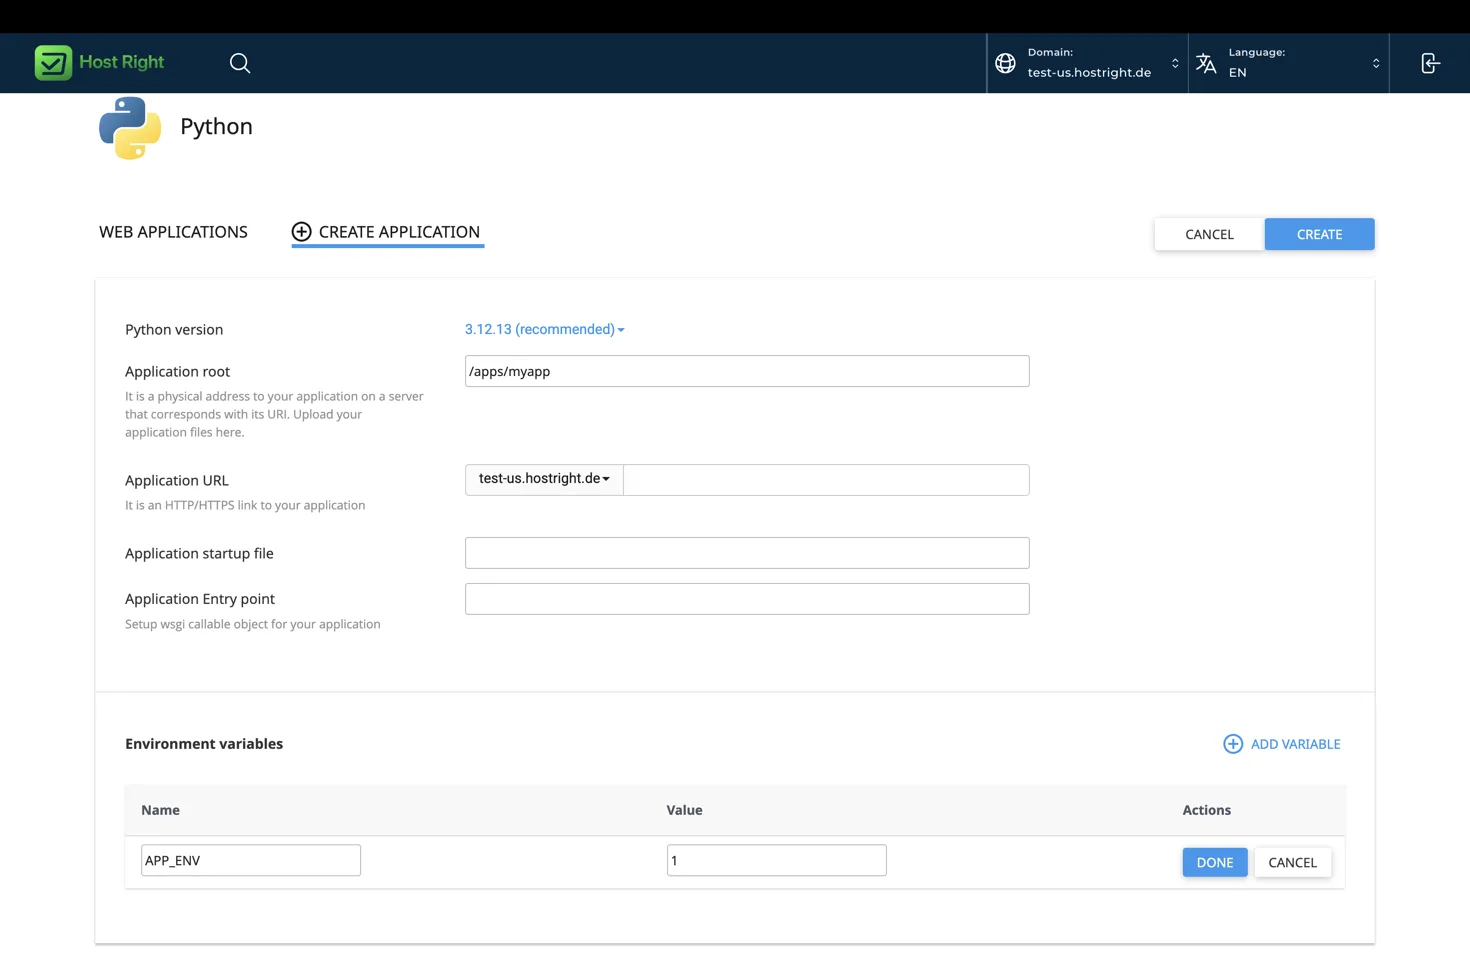
application. - Environment variables: Add the configuration values required by the application.
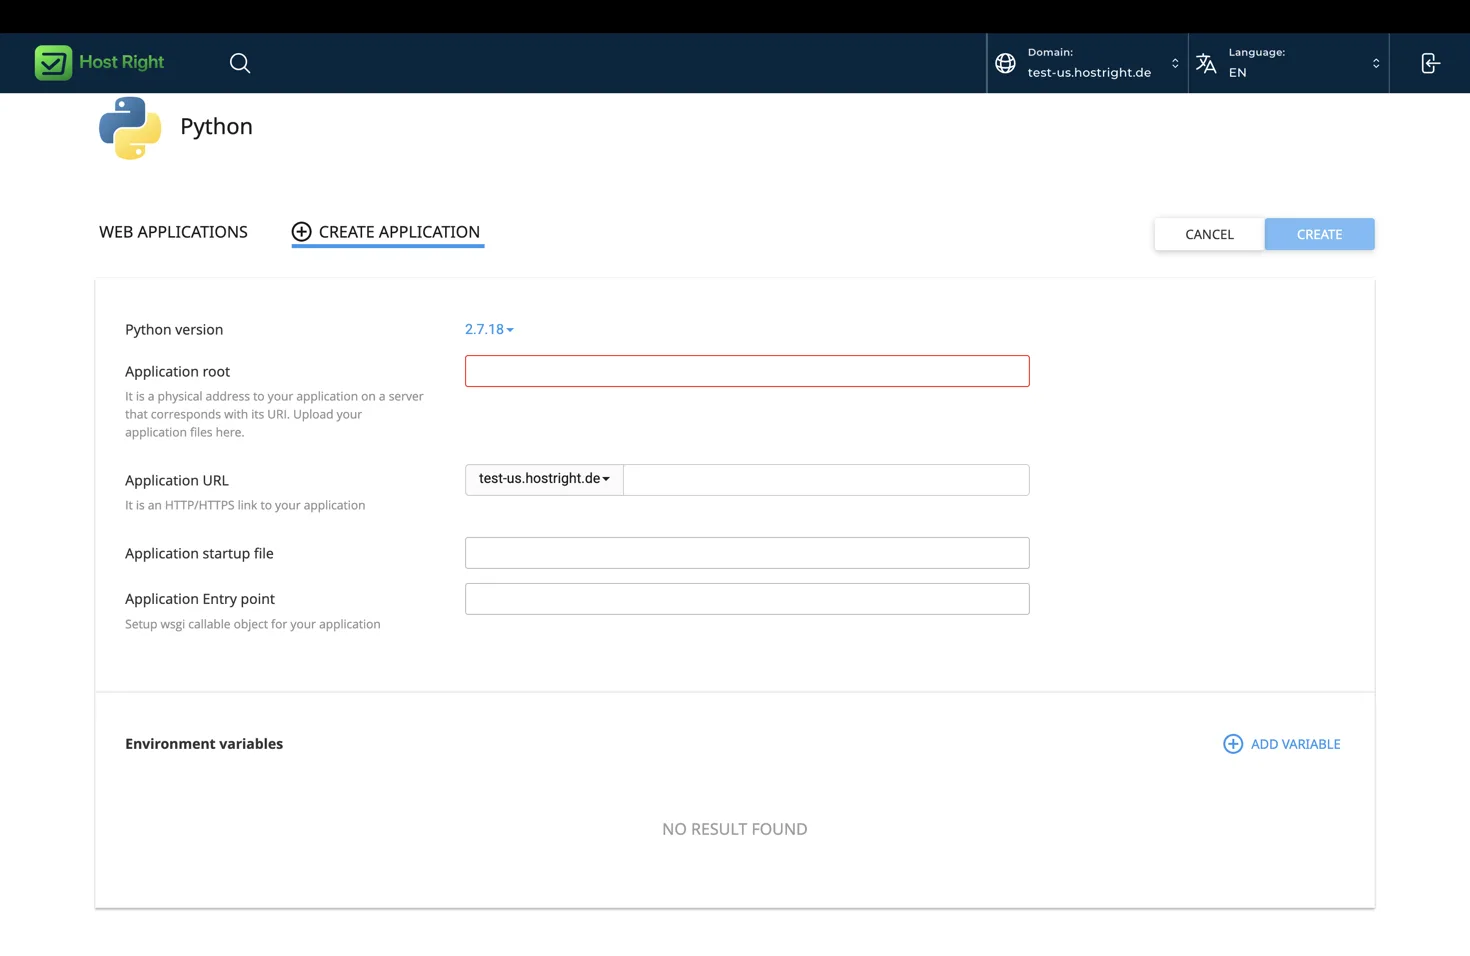
For a common WSGI application, use:
Application startup file: passenger_wsgi.py
Application entry point: application
Do not assume that app.py is the startup file. Passenger needs the file that exposes the WSGI callable. Create it explicitly when the framework does not already provide one.
After selecting Create, HostRight Control Panel shows the application and its current status.
Create the Passenger startup file
Passenger imports the startup file and looks for the callable named in Application entry point. A minimal Flask example is:
# passenger_wsgi.py
from app import app as application
For Django:
# passenger_wsgi.py
import os
os.environ.setdefault("DJANGO_SETTINGS_MODULE", "project.settings")
from project.wsgi import application
The package name must match the directory containing settings.py and wsgi.py.
Install dependencies and configure the app
Keep a reviewed requirements.txt in the project. From SSH, use the environment assigned to the Python application. Replace the activation path with the one shown by HostRight Control Panel:
cd ~/apps/example-app
source ~/virtualenvs/example-app/bin/activate
python -m pip install --upgrade pip
python -m pip install -r requirements.txt
python -m pip list
python -c "import sys; print(sys.version)"
Do not install packages globally. Use environment variables for production configuration:
APP_ENV=production
SECRET_KEY=replace-with-a-long-random-value
DATABASE_URL=replace-with-your-database-connection
REDIS_SOCKET=/path/shown/in/the/control-panel
Never commit secrets, private keys, database passwords, or API tokens.
Run setup commands and reload Passenger
From the private application root, run framework setup commands:
python manage.py migrate
python manage.py collectstatic --noinput
For Flask, Pyramid, Bottle, or custom WSGI applications, run the project’s documented initialization command. After changing code, dependencies, variables, or the startup file, restart or reload the application using the HostRight Control Panel control. If no reload action is visible, use the command documented by the hosting interface or contact support.
Test the deployment
curl -I https://example.com
curl -fsS https://example.com/healthz
Check that the domain resolves correctly, HTTPS is active, the startup file imports, the callable name matches HostRight Control Panel, static files load, database connections work, and logs do not show repeated Passenger failures.
Test the import directly when troubleshooting:
cd ~/apps/example-app
python -c "import passenger_wsgi; print(passenger_wsgi.application)"
Common errors
Import or startup error: Check the application root, startup filename, entry point, package names, and Python version.
Static files return 404: Run the framework’s collection command and confirm the public static directory.
Database connection failure: Check the database host, name, user, password, and port. Keep credentials in environment variables.
Changes do not appear: Confirm that files were uploaded to the application root, dependencies were installed in the correct environment, and Passenger was reloaded.
FastAPI or another ASGI framework: HostRight’s interface currently expects WSGI. FastAPI is ASGI, so a direct uvicorn deployment is not the same as a Passenger WSGI application. See the FastAPI and ASGI notes before production use.